Time-Traveler

时光旅人,向往美好

0%

1.作用

让标签中无法动态修改的属性可以动态修改

2.v-bind语法糖

1
2
v-bind:src=''
:src=''

3.基本使用

1
2
3
4
5
6
7
8
9
10
11
12
13
14
15
16
17
<div id="app">
<!--只有使用v-bind修饰的属性,才是可以动态变化的-->
<img v-bind:src="imgURL" alt="">
<!--错误写法-->
<!--<img src="imgURL" alt="">-->
</div>
<script src="../../js/vue.js"></script>
<script>
let app = new Vue({
el: '#app',
data: {
imgURL:'https://images.pexels.com/photos/163077/' +
'mario-yoschi-figures-funny-163077.jpeg?' +
'auto=compress&cs=tinysrgb&dpr=1&w=500',
},
})
</script>

4.使用v-bind动态修改class

1.对象语法

通过添加v-bind并在类名中以对象的形式

1
2
3
4
5
6
7
8
9
10
11
12
13
14
15
16
17
18
19
20
21
22
23
24
25
26
27
28
29
30
31
32
33
34
35
<!DOCTYPE html>
<html lang="en">
<head>
<meta charset="UTF-8">
<title>v-bind动态修改类名</title>
<style>
.active {
color: red;
}
</style>
</head>
<body>
<div id="app">
<!--这里对量里面的格式是{类名1:boolean,类名2:boolean}-->
<h2 :class="{active:isActive}">王二蛋</h2>
<!--这里对量里面的格式是{类名1:boolean,类名2:boolean}-->
<!--<h2 class='title' :class="{active:isActive}">王二蛋</h2>-->
<button @click="change">切换</button>
</div>
<script src="../../js/vue.js"></script>
<script>
let app = new Vue({
el: '#app',
data: {
isActive: true,
},
methods: {
change: function (){
this.isActive = !this.isActive;
}
}
})
</script>
</body>
</html>

2.数组语法

略微鸡肋,知道有这个东西,以后说不定会用到

1.v-for

自动遍历渲染相对应的数组内容

1
2
3
4
5
6
7
8
9
10
11
12
13
14
15
16
17
18
19
20
21
22
23
<div id="app">
<div :key="item.id" v-for="(item,index) in fruit">{{item.name}}</div>
</div>
<script src="../../js/vue.js"></script>
<script>
let app = new Vue({
el: '#app',
data: {
fruit: [{
name: 'apple',
id: 1,
},{
name: 'banana',
id: 2,
},{
name: 'pear',
id: 3,
}]
},
methods: {
}
})
</script>

tips:注意这里记得使用v-bind:key=’id’**或者:key=’id’**来提高vue渲染器的性能,但是对于实际开发没有任何影响

2.v-once

被修饰的html标签中的mustache语法不会再因为变量内容修改而被修改,优点是可以提高网页性能

1
2
3
4
5
6
7
8
9
10
11
12
13
14
15
16
17
18
19
20
21
   <div id="app">
<div>{{message}}</div>
<div v-once>{{message}}</div>
<!-- v-once的作用是让被修饰的标签的mustache语法
不会因为对象内容被修改而修改-->
<button v-on:click="click">修改</button>
</div>
<script src="../../js/vue.js"></script>
<script>
let app = new Vue({
el: '#app',
data: {
message: '修改前是阴天',
},
methods: {
click: function () {
this.message = '修改后是晴天';
},
}
})
</script>

3.v-text和v-html

v-text跟原生js的**ele.innerText()**有类似的意思

v-html和原生js的**ele.innerHTML()**有类似的意思

1
2
3
4
5
6
7
8
9
10
11
12
13
14
15
16
17
18
19
20
<div id="app">
<div>{{message}}你好帅!</div>
<div v-text="message">你好帅!</div>
<!--v-text不够灵活-->
<div v-html="url"></div>
<a href=""></a>
</div>
<script src="../../js/vue.js"></script>
<script>
let app = new Vue({
el: '#app',
data: {
message: '你好二蛋!',
url: '<a href="#">你好二蛋!</a>'
},
methods: {

}
})
</script>

4.v-pre

让被修饰的标签中的mustache语法失效,从而直接显示双大括号

1
2
3
4
5
6
7
8
9
10
11
12
13
14
15
16
17
<div id="app">
<div>{{message}}</div>
<div v-pre>{{message}}</div>
<!--v-pre = prevent:作用是让mustache语法失效-->
</div>
<script src="../../js/vue.js"></script>
<script>
let app = new Vue({
el: '#app',
data: {
message: 123,
},
methods: {

}
})
</script>

5.v-choak(解决闪动问题)

更推荐使用v-text语法

vue解析之前,div中有一个属性v-cloak

vue解析之后,div中的v-cloak属性被删除

1
2
3
4
5
6
7
8
9
10
11
12
13
14
15
16
17
18
19
20
21
22
23
24
25
26
<!--css部分-->
<style>
[v-cloak] {
display: none;
}
</style>

<!--html部分-->
<div id="app">
<h2 v-cloak>{{message}}</h2>
</div>

<!--js部分-->
<script>
setTimeout(function () {
let app = new Vue({
el: '#app',
data: {
message: '你好二蛋!',
},
methods: {

}
})
},2000)
</script>

6.v-show

决定元素是否显示出来

1
2
3
4
5
6
7
8
9
10
11
12
13
14
15
16
17
18
19
<div id="app">
<div class="pink box"></div>
<div class="lightBlue box" v-show="isShow"></div>
<button @click="showHandle">显示/隐藏</button>
</div>
<script src="../../js/vue.js"></script>
<script>
let app = new Vue({
el: '#app',
data: {
isShow: true,
},
methods: {
showHandle: function (){
this.isShow = !this.isShow;
}
}
})
</script>

7.v-if & v-else-if & v-else

1
2
3
4
5
6
7
8
9
10
11
12
13
14
15
16
<div id="app">
<div v-if="msg>90">优秀</div>
<div v-else-if="msg<=90&&msg>80">良好</div>
<div v-else-if="msg<=80&&msg>70">及格</div>
<div v-else="msg<=70">不及格</div>
</div>
<script src="../../js/vue.js"></script>
<script>
let app = new Vue({
el: '#app',
data: {
msg: 88,
},
methods: {}
})
</script>

补充v-if可以和v-for一起使用

1
2
3
4
5
6
7
8
9
10
11
12
13
14
15
16
17
<div id="app">
<div v-if='item === 22' v-for="(item,key,index) in obj">{{(index + 1) + '---' + key + ': ' + item }}</div>
</div>
<script src="../../js/vue.js"></script>
<script>
let app = new Vue({
el: '#app',
data: {
obj: {
name: 'Jamie',
gender: 'male',
age: 22
}
},
methods: {}
})
</script>

结果只显示

1
3---age: 22

1.MVVM

View:Dom树,可视化的部分

View-Model:即我们所用的Vue,分为两部分,分别为DomLinsteners和DataBindings

  1. DomLinstener: View->Model
  2. DataBindings: Model->View

Model:js代码中自己定义的部分,或者网络上传来的数据

2.语法糖

语法糖(Syntactic sugar),也译为糖衣语法,是由英国计算机科学家彼得·约翰·兰达(Peter J. Landin)发明的一个术语,指计算机语言中添加的某种语法,这种语法对语言的功能并没有影响,但是更方便程序员使用。通常来说使用语法糖能够增加程序的可读性,从而减少程序代码出错的机会。

Vue中的语法糖

已知语法糖

1
2
v-on:click=''
@click=''
1
2
v-bind:src=''
:src=''

3.Vue的生命周期

可以理解为,vue是封装好的,创建的过程中,他会有很多步骤,当你定义了类似于create的生命周期函数之后,他会在做完一些我们看不见的操作之后,将这个function作为回调函数调用,在源码中是以**callHook(vm,fn())**的形式

具体流程

1
2
3
4
beforeCreate(){}
created(){}
beforeMount(){}
mounted(){}

Vue 实例生命周期

题目描述:

给定一个三角形,找出自顶向下的最小路径和。每一步只能移动到下一行中相邻的结点上。

相邻的结点 在这里指的是 下标 与 上一层结点下标 相同或者等于 上一层结点下标 + 1 的两个结点。

例如,给定三角形:

1
2
3
4
5
6
[
[2],
[3,4],
[6,5,7],
[4,1,8,3]
]

自顶向下的最小路径和为 11(即,2 + 3 + 5 + 1 = 11)。

思路:

自下而上,可以更好的推进最小路径,否则需要多次判断。

  1. 深复制一个与三角形最后一行的数组resArr,用于保存当前的路径权值
  2. 按照顺序计算两个相邻路径长度,取小的与上层路径长度相加并覆盖到resArr中。
  3. 遍历到倒数第二行停止,获取resArr第一个元素,返回

实现:

1
2
3
4
5
6
7
8
9
10
11
12
13
14
15
16
17
18
19
var minimumTotal = function(triangle) {
var resArr = [];
for(var i = 0; i < triangle.length; i++){
resArr[i]=triangle[triangle.length-1][i];
}

for(var i = triangle.length-1; i > 0; i--){
for(var j = 0; j < i; j++){
// 比较当前路径长度,取较小的与上层相加并覆盖
if (resArr[j] <= resArr[j+1]){
resArr[j] = resArr[j] + triangle[i-1][j];
}else{
resArr[j] = resArr[j+1] + triangle[i-1][j];
}
}
}

return resArr[0];
};

变形虫碰撞(点击可以跳转)

1
2
3
4
5
6
7
8
9
10
11
12
13
14
15
16
17
18
19
20
21
22
23
24
25
26
27
28
29
30
31
import java.text.DecimalFormat;
import java.util.Arrays;
import java.util.Scanner;

public class Main {
public static void main(String[] args) {
//读取键盘输入
Scanner scan = new Scanner(System.in);
int num = scan.nextInt();
double[] weight = new double[num];
for(int i=0;i<num;i++){
weight[i] = scan.nextDouble();
}

//小到大排序
Arrays.sort(weight);
double SumWeight=weight[weight.length-1];

//计算几何平均值
for(int i = num-1;i>0;i--){
double sqrt = Math.sqrt(SumWeight*weight[i-1]);
SumWeight=2 * sqrt;
}

//格式化输出
String parten = "#0.000";
DecimalFormat decimal = new DecimalFormat(parten);
String reweight = decimal.format(SumWeight);
System.out.println(reweight);
}
}

电话号码减法游戏

1
2
3
4
5
6
7
8
9
10
11
12
13
14
15
16
17
18
19
20
21
22
23
24
25
26
27
28
29
import java.util.Scanner;

public class Main {
public static void main(String[] args) {
Scanner scan = new Scanner(System.in);
int length = scan.nextInt();
int num8 = 0;
int numOther = 0;

String TelPhoNum = scan.next().substring(0,length-10);
char[] charTPN = TelPhoNum.toCharArray();
for (char a: charTPN) {
String n = a+"";
int b = Integer.parseInt(n);
if(b==8){
num8++;
}else{
numOther++;
}
}

if(num8>numOther){
System.out.println("Yes");
}else{
System.out.println("No");
}
}
}

农场主安排奶牛工作

1
2
3
4
5
6
7
8
9
10
11
12
13
14
15
16
17
18
19
20
21
22
23
24
25
26
27
28
29
30
31
32
33
34
35
36
37
38
39
40
41
42
43
44
45
46
47
48
49
50
51
52
53
54
55
56
57
58
59
60
61
62
63
64
65
66
import java.util.ArrayList;
import java.util.Scanner;

public class Main {
public static void main(String[] args) {
Scanner scan = new Scanner(System.in);
int cowNumber = scan.nextInt();
int end=scan.nextInt();

ArrayList<Cow> cow = new ArrayList<Cow>(cowNumber);

for(int i=0;i<cowNumber;i++){
int a = scan.nextInt();
int b = scan.nextInt();
Cow newcow = new Cow(a,b);
cow.add(newcow);
}


int workCowNum=0;
int worktime=0;
int workstart = cow.get(0).start;
int workend = cow.get(0).end;
boolean iswork=false;
boolean isend=false;
for (int i=0;i<cow.size();i++){
for(int j=i;j<cow.size();j++){
if(cow.get(j).end>=end){
i=j;
iswork = true;
isend = true;
break;
}
if(workstart<=cow.get(j).start&&workend>=cow.get(j).end){
if(worktime<=cow.get(j).end-workend) {
iswork=true;
i=j;
}
}
}

if(iswork){
workstart = workend;
workend = cow.get(i).end;
worktime = cow.get(i).end - workend;
workCowNum++;
iswork = false;
}

if(isend){
break;
}
}

System.out.println(workCowNum+1);
}
}

class Cow{
int start;
int end;
public Cow(int a,int b){
this.start = a;
this.end = b;
}
}

前言:

现在各个博客平台,要么免费有广告,要么就收费,让喜欢当白嫖党的我们烦躁不已。所以,想不想拥有一个炫酷的个人博客来展示自己呢?本文将为你介绍如何从头搭建一个hexo个人博客(完全免费的噢!)。

博客架构: hexo+gitee page/github page

1.工具准备

1.下载Git

下载Git,安装一路next

2.下载Node.js

下载Node.js,安装一路next

3.安装Hexo

1
2
3
4
// 安装指令
npm install -g hexo-cli
// 检验指令
hexo -v

2.搭建hexo

1.创建

1
hexo init yourBlogName

2.使用

1
2
hexo g
hexo s

然后我们就可以访问hexo主页了,是不是很惊喜!

3.安装deploy-git工具

这个是为了我们后面上传到gitee做准备

1
npm install hexo-deployer-git --save

4.重新渲染

在我们对hexo的配置或者是内容修改后,都需要进行重新构建,这两个命令会经常用到

1
2
hexo clean
hexo g -d

3.同步到gitee和github

1.gitee

1.注册账号

自己操作

2.创建仓库

1.找到自己的id

查看自己的地址栏,gitee.com后面带的就是你的id了

image-20200912103726726

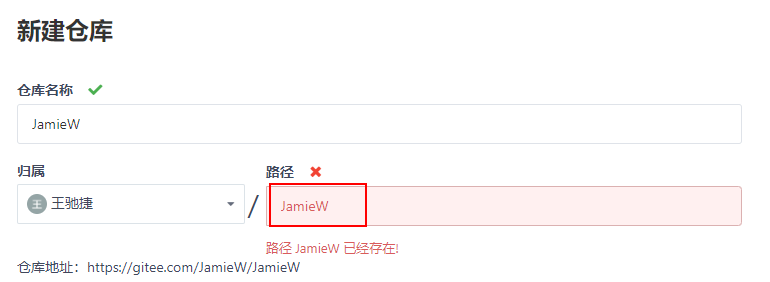
tips:可以给自己起一个好听的英文名字,然后在个人信息中替换掉,以后你把网站给别人的时候,别人看到你的网站名字才足够优雅!

2.创建仓库

右上角加号创建仓库

仓库名字就填你的id,一摸一样就可以

image-20200912103936682

因为我已经创建过了,所以存在,下方的选项自己看情况勾选

3.同步

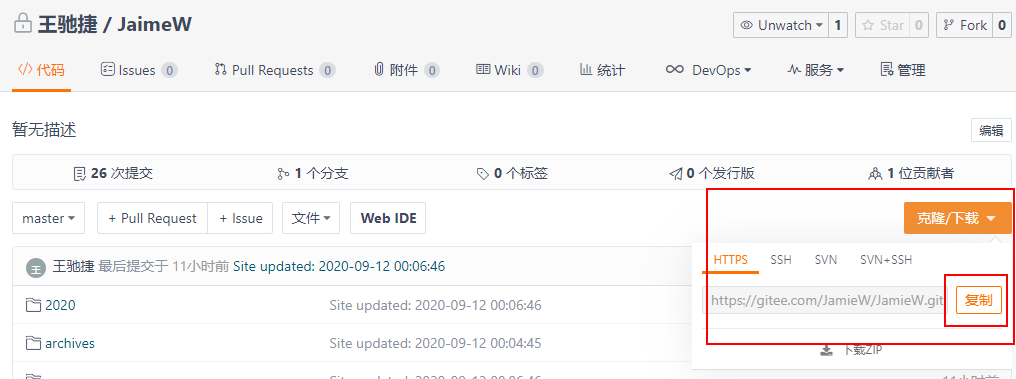
1.复制仓库地址

复制仓库地址

image-20200912104143145

打开你刚刚创建hexo的地方,找到_config.yml这个文件,使用记事本或者说sublime打开

拉到最下面,将仓库地址填入repo关键字后面,注意冒号后面有一个空格,其余两个关键字跟我一样

image-20200912104439210

然后ctrl+F找到url,填写将来你生成出来的网站地址https://yourId.gitee.io, 只有严格按照上面仓库命名才可以噢!

image-20200912111517557

2.同步

使用前面说的重新构建的命令

1
2
hexo clean
hexo g -d

这个时候会要求你输入gitee的账号密码,输入之后即可上传到你所创建的仓库内

配置ssh密钥可以免密码输入,具体百度,本文不过多介绍

3.部署Gitee Pages

点击

image-20200912105353806

勾选强制使用https

点击部署or更新

注意,以后每一次上传完文章都要来这里点击更新(这个是相对于github不好的地方,可是谁叫它加载快呢!只能是含泪接受它的缺点了)

4.体验

在地址栏输入 yourGiteeName.gitee.io即可访问你的hexo博客啦!

2.github

1.注册账号

自己操作

2.创建仓库

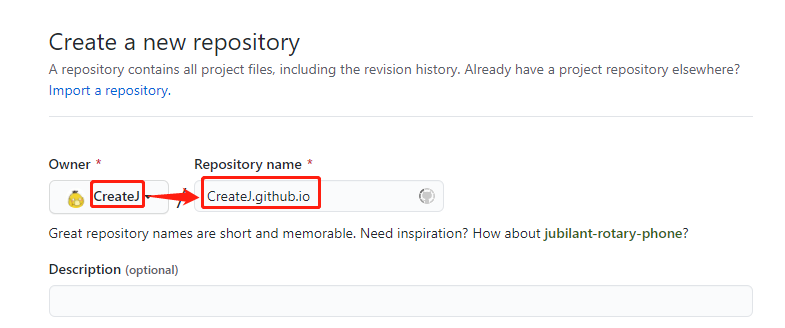
image-20200916144148897

命名要跟自己的用户名一样,才能开启github page,一定要按照这个规则来噢!
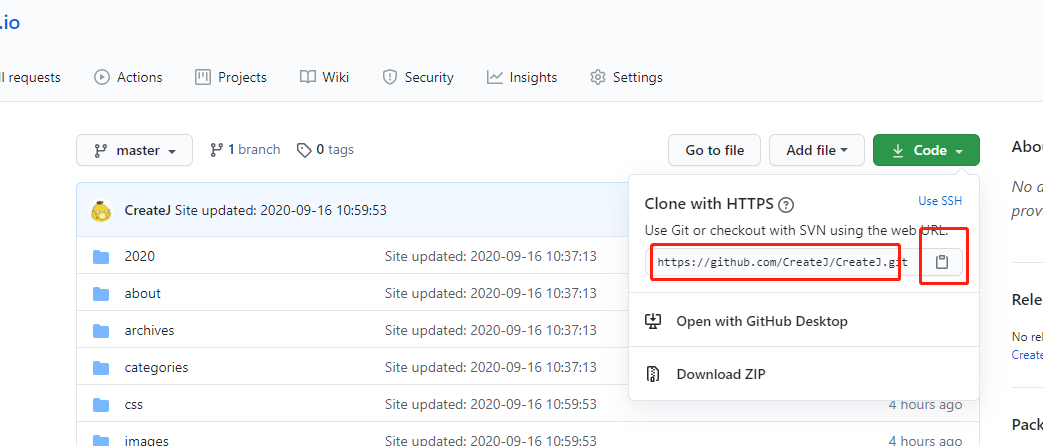
3.同步

1.复制仓库地址

image-20200916144315546

2.同步

将地址以下图形式粘贴到_config.yml文件中,并补充相应的内容

image-20200916144621858

然后将https://yourGithubName.github.io粘贴到以下位置

image-20200916153033453

3.部署到github page

保存_config.yml文件

执行

1
2
hexo clean
hexo g -d

部署这一步是github自动的,比gitee要优秀的多

4.体验

这个时候在地址栏输入yourGithubName.github.io即可访问你的hexo博客啦!

Github.io访问被拒解决方法(逐步更新)

1.修改host文件

一般在路径C:\Windows\System32\drivers\etc下,正常情况下没办法直接修改host文件,可以复制出来,然后修改完在复制回去,然后确认管理员权限即可

1.点击这里跳转查看github.com的ip地址

image-20200916145734151

2.点击这里查看github.global.ssl.fastly.net的ip地址

image-20200916145953466

3.点击这里查看github.io的ip地址

image-20200916150028081

最后,按照以下格式添加到host文件的最后面

1
2
3
4
5
6
7
140.82.114.3 github.com
199.232.69.194 github.global.ssl.fastly.net

185.199.108.153 github.github.io
185.199.109.153 github.github.io
185.199.110.153 github.github.io
185.199.111.153 github.github.io

2.修改DNS地址

将ipv4协议的DNS解析地址修改为114.114.114.114

1.特点

后进先出、受限制的线性结构

2.实现

通过js的数组,能够轻松完成封装其所有基本功能

1
2
3
4
5
6
7
8
9
10
11
12
13
14
15
16
17
18
19
20
21
22
23
24
25
26
27
28
29
30
31
32
function Stack(){
this.items = [];

// 1、入栈
Stack.prototype.push = function (element) {
this.items.push(element);
}
// 2、出栈
Stack.prototype.pop = function () {
return this.items.pop();
}
// 3、查看栈顶元素
Stack.prototype.peek = function () {
return this.items.peek();
}
// 4、判断栈是否为空
Stack.prototype.isEmpty = function () {
return this.items.length == 0;
}
// 5、获取栈中元素的数量
Stack.prototype.size = function () {
return this.items.length;
}
// 6、toString方法
Stack.prototype.toString = function(){
var resultString = '';
for(var i = 0; i < this.items.length; i++){
resultString += this.items[i] + ' ';
}
return resultString;
}
}

3.实际应用

1.leetcodeT504

问题描述:

给定一个整数,将其转化为7进制,并以字符串形式输出。

示例 1:

1
2
输入: 100
输出: "202"

示例 2:

1
2
输入: -7
输出: "-10"

代码

1
2
3
4
5
6
7
8
9
10
11
12
13
14
15
16
17
18
19
20
21
22
23
24
var convertToBase7 = function(num) {
var a = num;
var arr = [];
var isFu = false;
if(a < 0){ //考虑需要转换的数字小于0的情况
isFu = true; //直接将其转换成正数
a = a * -1;
}
if(a == 0){ //考虑需要转换的数字等于0的情况
return '0';
}
while(a != 0){
arr.push(a % 7);
a = Math.floor(a / 7);
}
var resultStr = '';
for(var i = arr.length-1; i >= 0 ; i--){
resultStr += arr[i]+'';
}
if(isFu){ //转换完成之后如果之前为负数,则在前面加上‘-’号
resultStr = '-' + resultStr;
}
return resultStr;
};

1.router–index.js文件各配置作用

mode:默认为hash模式,不方便使用history.pushState

linkActiveClass:用于将渲染出来的html文件中的router-link-active|Class替换成active,便于代码维护

1
2
3
4
5
6
7
8
9
10
11
12
13
14
15
16
17
18
19
20
21
22
23
24
25
26
27
28
import Vue from 'vue'
import Router from 'vue-router'
//这里注意要将使用到的组件导入进来
//普通导入方法
//import Home from '@/components/Home'
//懒加载写法
const Home = () => import('../components/Home.vue')

//所有的插件都需要使用vue.use(插件名)导入
Vue.use(Router)

export default new Router({
mode: 'history',
linkActiveClass: 'active',
routes: [
{
// 根目录写在最前面
path: '',
redirect: '/home', //重定向
},{
path: '/home',
// 这个是为了同个页面不同个组件区分时使用
// eg: <router-view name="Hello"/>
name: 'Home',
component: Home,
},
]
})

2.router跳转方式

1.html中

1
2
<router-link to="/home" tag="button" replace>首页</router-link>
<router-link to="/about" tag="button" replace>关于</router-link>
  1. to指向要跳转的页面
  2. tag表示要渲染成的标签类型
  3. replace表示是否可以前进后退

2.js中

1
2
this.$router.push('/home');
this.$router.replace('/home');

push()**和replace()**的区别

push可以通过浏览器左上方的前进后退记录,原理跟栈差不多

replace不行

3.动态路由

1.添加

1
<router-link :to="'/user/'+userId" tag="button" replace>用户</router-link>
1
2
3
4
5
6
data: function(){
return {
userId: 'Jamie'
}
},
}

这里to属性需要使用冒号修饰,保证可以使用data中的属性

2.子组件获取路由参数

使用this.$route.params.userId获取

3.router和route的区别

router是指整个对象

route是指当前活跃的路由对象

4.路由懒加载写法

1.结合vue异步组件和Webpack的代码分析(过于复杂,不推荐)

2.AMD写法

1
const Home = resolve => require(['../components/Home.vue'],resolve);

3.ES6写法(推荐)

1
const Home = () => import('../components/Home.vue');

5.路由传参

1.使用query方式传参(复杂对象)

父组件中

1
<router-link :to="{path:'/profile',query:{name: 'Jamie',age:'22',height:'1.70'}}" tag="button" replace>档案</router-link>

子组件中

1
2
3
4
5
6
7
8
<template>
<div id="profile">
<h2>这里是档案</h2>
<h2>姓名:{{$route.query.name}}</h2>
<h2>年龄:{{$route.query.age}}</h2>
<h2>身高:{{$route.query.height}}</h2>
</div>
</template>

2.使用params方式传参(简单参数)

父组件中

1
<router-link :to="''/user/'+userId" tag="button" replace>用户</router-link>

子组件中d

1
this.$route.params.userId

6.守卫导航

使用方法:

在**/router->index.js中,覆盖了router组件的beforeEach**生命周期函数

1
2
3
4
5
6
7
8
9
10
router.beforeEach((to, from, next) => {
// 原理:
// 当路由切换的时候,自动调用beforeEach中的内容,对网页进行修改的过程

// 这个功能是为了实现切换路由的时候,标签的名字自动更改
// 这里meta是元数据(描述数据的数据)的意思,需要在route定义的时候添加一个meta对象才能读取到
// 将title放在里面方便读取 eg:meta: { title: "首页" },meta与name等属性同级
document.title = to.meta.title;
next();
})

7.路由使用实例1

切换到兄弟组件时,保存当前组件中子组件的选中状态,下次返回该组件的时候访问该子组件

1
2
3
4
5
6
7
8
9
10
11
12
13
14
15
16
17
18
19
20
21
22
23
export default{
data() {
return {
path: '/home/news'
};
},
created() {
console.log('create + ' + this.path);
this.$router.push(this.path)
},
activated(){
console.log('activated + '+ this.$route.path);
this.$router.push(this.path);
},
beforeRouteLeave(to,form,next){
console.log('before route leave + ' + this.$route.path);
this.path = this.$route.path;
next()
},
deactivated(){
// 激活时间太晚,route已经更新成另一个组件了,不适用
},
}

bug合集

1.使用click方式跳转同个路由的时候路由器控制台会爆红

原因:

阻止多余的同名路由跳转,节省浏览器资源

解决方法:

跳转路由的时候,多加一层判定,判断原路由与目标路由是否相同,若不同则切换路由

1
2
3
if(this.$route.path != nextPath){
this.$router.replace(nextPath);
}

无法理解的部分

关于router源码部分在视频第113集

描述

给定两个数组,编写一个函数来计算它们的交集。

示例 1:

1
2
输入:nums1 = [1,2,2,1], nums2 = [2,2]
输出:[2,2]

示例 2:

1
2
输入:nums1 = [4,9,5], nums2 = [9,4,9,8,4]
输出:[4,9]

思路:

  1. 分别使用两个字典统计数字出现的次数
  2. 遍历其中一个字典,寻找另一个字典中是否出现相同相同的key
  3. 若出现,对比权值,按照权值小的次数添加进resStr数组中

实现:

1
2
3
4
5
6
7
8
9
10
11
12
13
14
15
16
17
18
19
20
21
22
23
24
25
26
27
28
29
30
31
32
33
34
35
36
37
38
var intersect = function(nums1, nums2) {
var dic1 = new Array();
var dic2 = new Array();
for(var a in nums1){
var s = nums1[a]+'';
if (dic1[s] == undefined){ //若从未出现过,初始化这个键值对
dic1[s] = '1';
}else{ //若出现过,则将其对应的value转换成数字+1再转成字符串储存
dic1[s] = (parseInt(dic1[s])+1)+'';
}
}
for(var b in nums2){
var s = nums2[b]+'';
if (dic2[s] == undefined){
dic2[s] = '1';
}else{
dic2[s] = (parseInt(dic2[s])+1)+'';
}
}

var resArr=[];
for(var key2 in dic2){
if(dic1[key2] != undefined){
// 比较相同的键值在两个字典中对应的值大小,
// 取小的作为次数,将键加入数组中
if(parseInt(dic1[key2]) >= parseInt(dic2[key2])){
for(var i = 0; i < parseInt(dic2[key2]);i++){
resArr.push(parseInt(key2));
}
}else{
for(var i = 0; i < parseInt(dic1[key2]);i++){
resArr.push(parseInt(key2));
}
}
}
}
return resArr;
};