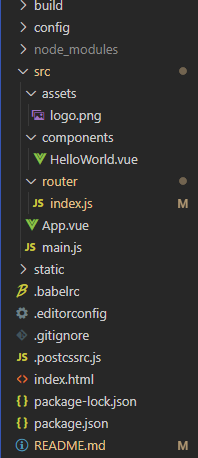
备注:
本文收录一些脚手架的配置信息,以及一些开发过程必要的操作
1.删除目录中不需要的资源

先把不必要的资源给删了
2.在compoments添加公共index.vue
1
2
3
4
5
6
7
8
9
10
11
12
13
14
15
16
17
18
19
20
21
22
23
24
25
| <template>
<div>
<h2>这里是index页面</h2>
</div>
</template>
<script>
export default {
name: "",
components: {},
props: {},
data() {
return {
};
},
watch: {},
computed: {},
methods: {},
created() {},
mounted() {}
};
</script>
<style scoped>
</style>
|
创建个人模板可以查看网上教程
3.配置vue-router
1
2
3
4
5
6
7
8
9
10
11
12
13
14
15
16
17
18
19
20
| import Vue from 'vue'
import Router from 'vue-router'
const Index=()=>import('../components/index')
Vue.use(Router)
export default new Router({
routes: [
{
path: '',
redirect: '/index',
},
{
path: '/index',
name: 'index',
component: Index
},
]
})
|
修改app.vue文件
1
2
3
4
5
6
7
8
9
10
11
12
13
14
15
16
17
18
19
| <template>
<div id="app">
<router-view></router-view>
</div>
</template>
<script>
import Index from './components/index'
export default {
name: 'App',
components: {
Index
}
}
</script>
<style>
</style>
|
4.安装vuex组件
在项目主目录运行
在src目录下添加store文件夹,创建index.js文件
初始化以下内容
1
2
3
4
5
6
7
8
9
10
11
12
13
14
15
16
| import Vue from "vue";
import Vuex from "vuex";
Vue.use(Vuex);
const store = new Vuex.Store({
state:{
testInfo: '测试vuex'
},
mutations:{},
getters:{},
actions:{},
modules:{}
})
export default store;
|
给**./compoments/index.vue** 的tamplate添加以下内容
1
2
3
4
5
6
7
| <template>
<div>
<h2>-----这里是index页面-----</h2>
<h2>-----vue测试-----</h2>
<div>{{$store.state.testInfo}}</div>
</div>
</template>
|
main.js修改为
1
2
3
4
5
6
7
8
9
10
11
12
13
14
| import Vue from "vue";
import App from "./App";
import router from "./router";
import store from './store';
Vue.config.productionTip = false;
new Vue({
el: "#app",
router,
store,
components: { App },
template: "<App/>"
});
|
5.为文件夹添加别名
目的是为了在后期文件结构复杂的时候,可以快速定位到相应的文件夹
不用担心改一下文件位置就得修改大部分文件路径
在主目录下添加vue.config.js文件,初始化以下内容
1
2
3
4
5
6
7
8
9
10
11
12
| module.exports = {
configureWebpack: {
resolve: {
alias: {
assets: "@/assets",
components: "@/components",
views: "@/views",
},
},
},
};
|
6.添加公共css文件
在/assets/css文件夹中添加base.css
公共样式卸载里面
然后在main.js中引入
1
| require('./assets/css/base.css');
|
启动项目
打开网页
1
| http://localhost:8080/#/index
|


